
By Barry Santini
Today, where buying an expensive five-axis CNC lens miller is becoming a routine purchase, you might think meeting any eyeglass edging challenge has become equally routine. But nothing is further from the truth. The reality is that most local optical stores have neither the need, the volume, nor the budget for such advanced equipment. Yet on any given day, a typical local optical office armed with a wheeled machine will face significant edging challenges, ranging from remounting existing lenses while a client is waiting to figure out how to put a 10D base curve lens into a 3D bevel curve frame. And tackling these difficult jobs, alongside the processing of the more mundane ones, must be done with as little accompanying drama as possible. To meet these challenges and more, an optical shop must formulate a strategic business plan for how they see the scope of in-office finishing, or IOF, head on. Let’s start by discussing why it’s essential to have a strategic business plan for IOF in the first place.
A STRATEGIC BUSINESS PLAN FOR IOF
When mapping out the business plan for in-office finishing, you must include the standard ROI calculations. But return on investment calculations should not be the sole basis for evaluating an IOF proposal. There are critical competitive advantages to having in-office edging:
- Faster delivery: The choices facing prescription eyewear consumers today are far greater and more varied than ever before. If you still think promising two-week eyewear delivery is OK, you need to think again. With consumers seeking to reduce costs more than ever, the appeal of competitively priced online companies such as Lensable and Replace-a-Lens cannot be denied. When your eyewear processing times and theirs are similar, you’re practically saying to them: “Go for it.” Considering that 70 percent of all eyeglass Rxs use finished single-vision lenses, there’s really no excuse for overly long eyewear delivery times.
- Better workmanship: Despite the unrivaled quality delivered by the latest milling edges, such as those made by MEI, the facts are that these super-advanced millers are turning out lenses with consistently greater precision than many frames are today. Yet this excellent precision is at odds with the variations in eye wire circumference encountered in today’s mass-produced, multi-factory frames. And simply targeting an average or mean-size circumference has not always yielded ideal results for many labs and OEM makers. To compensate for these frame-to-frame size variations, some suggest we should turn more to remote tracing and remote edging. But that approach has its pitfalls, leading to the conclusion that the best edging happens when the exact frame is present and at hand. If you need to send the client’s frame out, where are the time and cost savings, especially when you factor in today’s high shipping costs? And having to send out their personal frame only compounds the inconvenience for the patient. Therefore, a local optical having an IOF lab still promises the highest quality, lowest turn time and lowest costs for processing eyewear.
- Maximum convenience: As convenient as buying glasses online appears, when it comes to after-sales services—and goodness knows that eyeglasses will always need service—nothing the internet companies can offer will ever match the convenience of walking into a nearby optical shop and asking for help. And with today’s mass-market frame quality still in a race to the bottom, the need to get a client up and seeing as soon as possible is more important now than ever. So being asked to remount a patient’s prescription lenses is becoming increasingly common. In addition, now that the Covid-19 pandemic has psychologically shortened the maximum travel distance consumers are willing to entertain for service, the more on-site edging capabilities a local optical has, the greater its advantage in today’s ultra-competitive marketplace.
- The plano sunglass offering: Let’s face it, millions and millions of sunglasses are sold every year. And those sunglass lenses are going to get scratched. Their owners will ask about changing out their lenses or possibly upgrading them into polarized, mirrored or color-enhancing lenses. In almost all cases, this is expected to be done on a while-you-wait or same-day basis. This is a real customer-making opportunity, one rarely factored into the ROI of an IOF lab, but no question is a massive service and profit opportunity.
THE EDGING PLAN
Once you’ve decided to bring edgework in house, there are several related supplies and expenses to consider if you are going to do it right:
- Stock Rx lens inventory: There’s almost no sense in putting in an IOF lab without including a companion prescription and plano sun lens inventory. Here are some best practices:
- Choose a budget Rx line: Choose one polycarbonate-based anti-glare lens offering and make sure its Rx range is extensive, easily and quickly restockable and value priced. To do this, you may have to do some serious homework and shop around. Remember: Rx range, good quality, extensive stock and price must be appropriately balanced.
- Select a high-quality Rx line: Especially if you see yourself in a position at the higher end of the market in your area, you should select a high-quality stock lens line that will be the standard bearer for the quality of your brand. Only the top-tier AR coatings will do here. The index of refraction is less critical, but I would not consider any lens made of PPG’s CR-39 monomer as a high-end offering to keep in stock. Consider PPG’s Trivex or better, a high index of 1.60. Remember: These lenses will define you as a quality supplier and reinforce the higher value, consistent with the prices they’re paying.
- Plano sun lens inventory: To participate in the plano sunglass market, you’ll need more than a few pairs of the following:
- Solid sun tints and polarized planos in the three primary colors of brown, gray and green-gray. Again, if you see yourself at the higher end of the market, make sure you also offer lenses with backside AR. Plan on duplicating the above in gradient offerings, if possible.
- Fashion gradient tints in at least six color offerings. These lenses are generally not expensive, so don’t be put off by the commitment required here.
- Mirrored polarized sun lenses, including the latest matte mirror offerings.
- Photochromic lenses—a modest inventory of gray and brown colors, preferably with AR.
- Cabinetry for the above: This can be the most significant challenge. However, you can find premade cabinetry of the appropriate dimensions at an office supply or even home furnishing stores like IKEA.
- Plano lenses: Stock these in various brands to access a variety of base curves and in polycarbonate and PPG’s CR-39 monomer. These will come into play with difficult client-remounting jobs. (See sidebar “Tackling the Remount.”)
THE WAR BETWEEN OPTICS AND
COSMETICS
In a perfect in-office finishing lab, every lens would be the ideal thickness, diameter and base curve; every frame choice would be an excellent choice for the prescription at hand’ and every job would cut out and fit perfectly with the edger set to “automatic” with the sizing set to 0.00. But we don’t live in a perfect world, and many jobs require a combination of experience, failure, learning, craft, intuition and the development of a sixth sense to know how to modify edger settings for the best result. And always at hand is the question of striking the ideal balance between the visual optics and the cosmetics of a finished pair of glasses. Ironically, in this field we call optics, these decisions consistently and overwhelmingly favor cosmetic rather than optical priorities. This is the battle eyecare professionals find themselves in. This is the war between optics and cosmetics, fought on behalf of every pair of glasses made.
THE BIG TIME
In the mid-20th century, both lens and frame manufacturers understood that the steeper base curve profile of corrected curve/best-form lenses was the only way to deliver superior optics. Most lenses came on or near a six-diopter base curve, and both plastic and metal frames had eye wires that nearly matched this curve. In the mid-1970s, frame sizes exploded, and using lenses with such steep curves was no longer a viable cosmetic option. By the mid-1980s, with the arrival of polycarbonate material, ECPs could order lenses that offered an unrivaled combination of lightweight, impact resistance and flatter profile curves. But the flatter curves that accompanied this lens material, along with poly’s low abbe value, compounded the peripheral optics issues in using larger eye sizes for many wearers.
THE FITTING CHALLENGE
Fitting lenses to these larger frames posed more new challenges. In the absence of higher index lens materials, the central challenge became how to conceal the lens profile thickness best. And this meant analyzing where to place the lens’ bevel to reduce the lens extension seen beyond the eye wire.
Even today, with the enormous variety of lens materials available, the finishing technician is often faced with figuring out the best way to obtain an excellent cosmetic result in a pair of glasses. Below is a list of the more common challenges encountered when trying to win the battle for cosmetics:
- Placing the bevel: Success at this depends on how you define “properly.” For most jobs, you’ll want to effectively use the profile thickness of the eye wire to cover up any lens edge reveal. But sometimes, this is not entirely possible because setting the bevel apex any place other than the very front of the lens could compromise the integrity of the lens fit. The general approach here is to measure with a ruler, the distance between the bottom apex of the frame’s bevel groove and the front limit of the eye wire. Measuring is performed at the four cardinal lens points: top, bottom, nasal and temporal. You will generally notice a uniform frame groove placement, but not always. Variations should be noted and correlated against the expected lens edge thickness at these points, a value displayed on most edgers after the lens has been traced. But sometimes, you will not have flexibility in where to set the bevel. This is commonly encountered with sports-wrap eyewear and conventional flat-metal styles. Here, in almost all cases and especially when the lens is polarized, the technician will have no choice but to track the front base curve of the lens. Determining where to place the bevel in these situations is fundamental to higher-end finishing and often borders on art. Allowing the edger to automatically assume the position of the bevel is not always an ideal strategy, although the auto setting on most edgers will produce at least an adequately acceptable result. One thing is certain: Opticians will debate how to best set a lens’ bevel as sure as the sun will rise tomorrow.
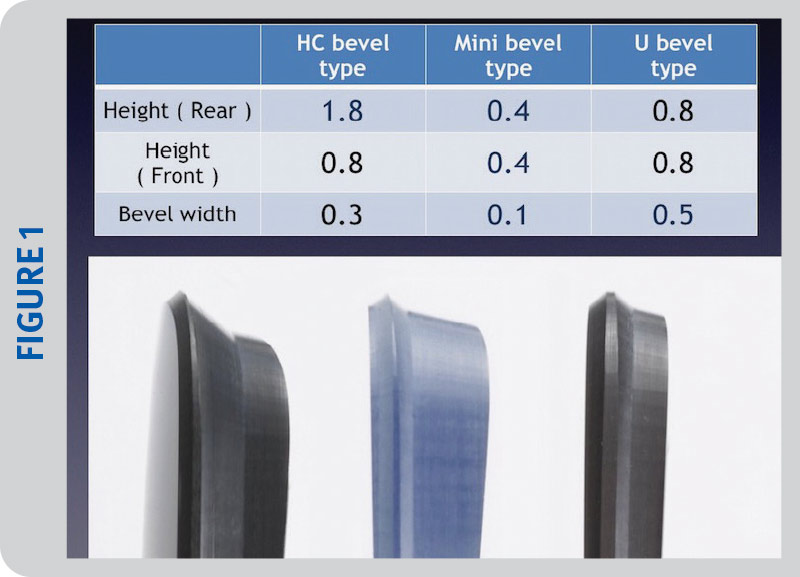
- Clearing the nose and endpieces: Ensuring a small amount of clearance between the lens’ edge and the frame, and at the temporal or nasal areas is vital to reduce lens chipping and frame splay. The only viable way to accomplish this is by accessing a sophisticated function of the latest edgers called variable bevel (See Figure 1). Variable beveling allows for different front and rear bevel shoulder heights by tapering or milling the edges in question. The actual amount of taper is optimally determined on a job-by-job basis. Again, proper execution here is akin to high art.
- Mis-matched base curves: All the finest opticians have been schooled in that the best overall optics are achieved when choosing a “best form” base curve. But today, these steeper curves can depart from an eye wire’s curve from two diopters to as much as seven diopters. To ensure the best lens-to-frame fit, the general goal is to match the bevel curve to the eye wire curve. Preserving the frame’s original alignment is the goal, and some serious magic is needed when placing a 9 diopter base curve in a 4 diopter frame. And that magic boils down to knowing the rules of lens-to-frame engagement.
THE RULES OF ENGAGEMENT
Asking a lens to be engaged to a frame is like a courtship in real life: There’s a first date, a getting-to-know-you phase and a desire to consummate the relationship. Here’s how the relationship between lens and frame often unfolds:
- The first date: This is the first time you try to edge a lens into a new frame. You’re cautious. You don’t rush. You look over the lens and frame, sizing both up. Your draw on your experience to see what obstacles or challenges might lie ahead—which is another way of saying, “Are they compatible?” And remember: First impressions count but rarely tell the whole story. (Note: I routinely cut test lenses of similar curves and thickness to help determine my target edger settings.)
- Getting to know you: Here, you’ve gone on a few dates, meaning you’ve glazed more than a few prescriptions of varying types, curves and thicknesses, and as a matchmaker, you’re starting to learn the where, why and who of each frame. As a tech, you remain cautious but are beginning to let your guard down. You’re enjoying the dating journey.
- Consummating the relationship: Armed with experience and familiarity, you’ve almost entirely dropped your guard. You now find no real work involved here, your comfort level is high, and you’ve embraced the idea that edging any prescription into that frame poses no problem. You look forward to glazing it since there are no surprises ahead. You have become “best friends.
STAYING ENGAGED
Many things are gratifying about being an optician, and the particular satisfaction that accompanies crafting a fine pair of glasses is definitely one of them. And if those glasses present challenges in marrying lens to frame, even more so. It is too bad that the schools and state examination boards educating and regulating opticians seem to have prioritized the fitting of contact lenses over the craft of fabricating eyewear. This means what little edging chops students or novices develop early in their career often atrophy over time, turning the occasional opportunity to “cut some glass” into a fear fest of anxiety and trepidation. And indeed, today’s ultra-computerized edging equipment can almost “do it all” when used by an untrained or unskilled operator. But what was true 50 years ago is true today: Knowing how to edge lenses tells the engaged optician so much more than simply how a lens fits a frame. Making glasses legitimizes you as a member of the heritage, prestige and craft in the 700 year history of spectacle makers.■
EXCEPTION TO THE RULE: TACKLING THE REMOUNT
Second only to the person who has completely lost their glasses, no consumer feels a more urgent need to see again than the person whose frame is broken beyond repair. With their Rx lenses in hand, as they see it, all you need to do is find a frame. Simple, right? Wrong. It’s only simple if the optician is free to choose the frame without constraints other than where the lenses will best fit. But this scenario only happens in a perfect world, and the last time I checked, we don’t live in one. So frame shape, size, color and price are always in play. So despite their urgency to quickly see again, this eyeglass consumer not only feels that they should have multiple options, but should be the ones to determine the final choice.
THE CHOSEN ONE
From an optician’s standpoint, the Rx lenses should fit the replacement frame as if they were made for it. While maintaining the proper height and PD are always a given, the chosen frame should look like it will fit the client’s lenses. But after executing your edger’s trace-lens function, it’s apparent that not everything will be peaches and cream in this lens-frame relationship. You realize you must alter lens centration or choose a different frame. The patient is waiting, they can’t see, their lenses aren’t fitting the chosen frame, and selecting a different frame is not an option. What do you do now?
PLANO TO THE RESCUE!
When a lens won’t trace out at the desired size and placement, and you feel out of options, I recommend reaching for a lowly plano lens as the best solution. Without altering the placement of the Rx lens on the block, using a plano lens of similar base curve and material has proved to be just what the doctor ordered.
Here’s how:
- Block the similar base curve plano and place it in the edger.
- Set the size to at least +1.00 mm.
- Edge the plano lens using the custom bevel function set to “front” curve.
- Adjust the bevel placement to 1.00 mm from the front curve.
- When the plano lens is finished, place the Rx lens that won’t cut out into the chamber.
- Retouch the Rx lens at the same +1.00 size. (This avoids the lens trace function!)
- Inspect/test the Rx lens, and retouch until you are close enough in size to glaze the frame. Use as little heat as possible. Note it’s likely the Rx lens may not be beveled completely around the circumference. This is OK. The frame’s bevel groove should prevent any gaps from being visible.
- Rinse/repeat with the other lens, using a set size only 0.25 mm above the final size for the first lens. Perform retouching until this lens is the right size.
- Glaze the frame with the second lens.
- Dispense the finished eyewear and bask in the feeling of a job well done. Whew!
Contributing editor Barry Santini is a New York State licensed optician and contact lens fitter with Long Island Opticians in Seaford, N.Y.