

THE SPECTRUM OF PRISM OPTICS – PART 1
By Andrew S. Bruce, LDO, ABOM, NCLEC
Release Date: April 1, 2020
Expiration Date: July 21, 2022
Learning Objectives:
Upon completion of this program, the participant should be able to:
- Provide an introduction to prism optics in ophthalmic lenses.
- Discuss ocular conditions and therapeutic uses for which prism might be prescribed.
- Discuss prism verification in ophthalmic lenses.
- Discuss frame and lens material considerations when prism is present in an ophthalmic lens.
- Understand the prismatic effect with the introduction of centration errors (unwanted prism).
Faculty/Editorial Board:
Andrew S. Bruce, LDO, ABOM, NCLEC
Credit Statement:
This course is approved for one (1) hour of CE credit by the American Board of Opticianry (ABO). General Knowledge. Course STWJHI305-2 ABO
Let’s be honest, how many of us feel the urge to run and hide when presented with a prescription that includes prism? It’s OK—you’re not alone. Most of us rarely see a prescription with prism; even seasoned opticians have little practical experience working with prescribed prism unless they work in a practice that specializes in prism. We can easily become intimidated, over think and over complicate the subject. Take a deep breath and follow along with me as we take a step-by-step approach to prism creation (unwanted or prescribed) in a lens, along with its function and visual impact. Once you understand the basic effects and uses of prism in eyeglasses, you will find much of your anxiety driven fear of prism alleviated. The purpose of this threepart course is to provide an introduction and explanation of prism and its uses, moving on to more advanced discussions and calculations.
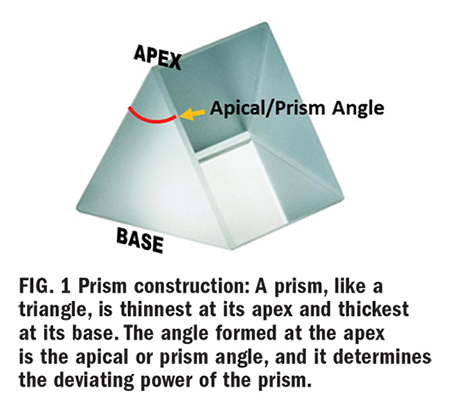
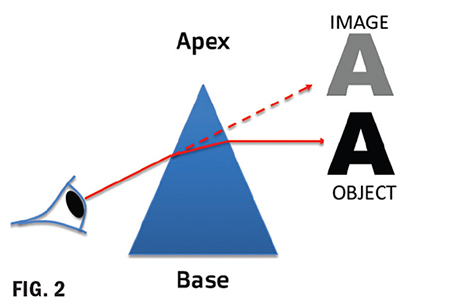
What is a prism? Prism is a transparent triangular refracting medium with a base and apex (Fig. 1). Its apical (prism) angle determines its dioptric power. A prism of one prism diopter power (∆D) produces a 1 cm apparent displacement of an object located one meter away. Light entering the prism will deviate toward its base—however, the apparent image shifts (is displaced) toward the prism apex (Fig. 2). When used to correct for eye deviations, prism displaces the image of the object to align with the eye’s deviated visual axis. The image formed on the retina of the deviated eye will now be similar to that formed on the retina of the nondeviated eye so that binocular fusion occurs, and the brain creates one single focused image by fusing the left and right retinal images.
A prisms’ ability to deflect light is measured in prism diopters, denoted as ∆D, the Greek capital letter delta symbol. A 1D prism will displace an image 1 cm at a distance of 1 meter. Note: A prism diopter and lens diopter is different. Prism diopters change the path of light. A lens diopter is a measure of focal power (vergence), its ability to converge or diverge light to shorten or lengthen the focal length. As you already know, lens dioptric power is the inverse of its focal length in meters. (1/f=D) But this is another lesson for another course; today, we are dealing with prism diopter.
Prism Convention
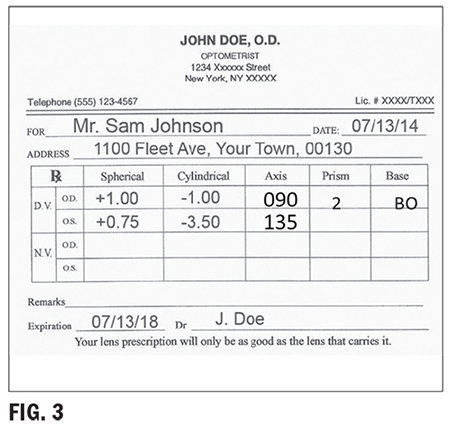
There are two methods used for specifying prism called rectangular coordinates (Fig. 3) and polar coordinates. The prescriber’s method uses rectangular coordinates of horizontal and vertical measurements. The laboratory reference system uses a polar coordinate system of specifying the direction in degrees. Prescribing doctors and opticians in the U.S. typically use rectangular, while optical labs and European countries use polar coordinates.
Rectangular Coordinates
Base In (BI), Base Out (BO), Base UP (BU) and Base Down (BD) or a combination of vertical and horizontal base directions.
COMPOUNDING OR CANCELING PRISMS
Rules for horizontal or lateral prism: Compounding effect (prismatic effects of each eye are additive)—The prism bases must be in the same direction OU. For example, BI OU. Canceling Effect (prismatic effects are subtractive)—The prism bases must be in opposite directions OU. For example, BI and BO.
Rules for vertical prism: Compounding effect—The prism bases must be in opposite directions OU. For example, BU and BD. Canceling effect—The prism bases must be in the same direction OU. For example, BU OU.
Oblique prism: Prisms are rarely just up, down, in or out. Most are oblique, which requires that a horizontal and vertical base direction be specified. Using rectangular coordinates will look like this example: OS 2D BI and 3D BU.
Rectangular coordinates can be converted to polar coordinates to determine the resultant prism. Labs typically use the 360 or 180 degree reference system to determine prism base direction. This means that the multiple base directions of the rectangular system are not used. Instead, the prism is resolved into the net amount of prism and degree of placement. What follows are the steps for converting rectangular coordinates to polar coordinates using the 360 degree lab reference system. Example: OS 5BO 2BU (Fig. 4)
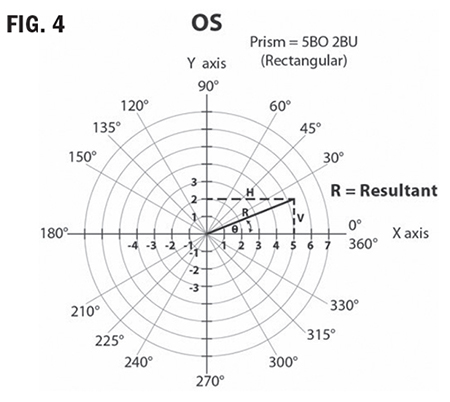
1. Create a grid showing 0 degree to 360
degrees. (Fig. 4)
2. Visualize which eye from the patient’s perspective.
3. Mark a point on the grid at 5BO and
another at 2BU.
4. Draw a vertical line from the 5BO point
and a horizontal line from the 2BU point.
5. The point of intersection of these two lines
is the resultant of the two combined.
6. Now draw a line from this point to the
center of the grid.
7. Using a mathematical equation known as
The Pythagorean Theorem, the length of
this resultant line can be calculated:
Resultant^2 = 5^2+2^2
Resultant = ∆ 29 = 5.39
8. Now, using geometry, the angle between the resultant and the horizontal (xaxis) can be calculated:
Sin angle = 2 ∆ 5.39 = 0.371
Sin angle = 21.8 degrees
Resultant polar coordinates of 5BO and 2BU OS = 5.39∆ @ 21.8 degrees
Don’t be concerned if this is too much math for comfort, or if you’re wondering what on earth is “Sin angle,” this is advanced optics. It will be handy when you sit for your Masters Certification, you will need to know how to determine resultant prism and how to resolve prism, and you will need an algebraic calculator. But for now, it is mentioned to illustrate the difference between the prescriber’s method and the lab method. Both are correct. 5BO and 2BU for the left eye, equals 5.39∆ @ 21.8 ∆. Although prism can be ordered in either polar coordinates or rectangular coordinates, your prism notation on your order should be precisely the same as the prescriber’s notation on the prescription.
Why split prism using the rules of compounding?
How does the brain handle prism? The eyes work as a team to produce binocular vision. When prismatic correction is placed in front of one eye, it affects both, the brain applies the effect binocularly. For this reason, the prism can be applied in just one eye or split between both, leading us to the topic of splitting prism. Note: Splitting prism should be done with the prescriber’s permission. Always check with the prescriber before splitting prism. Why do we want or need to split prism, and how is this beneficial? Answer: to balance the added weight and thickness resulting from prism, between the two lenses.
Let’s look at the following prescription example:
OD: 4.00 DS 8∆BD
OS: 2.00 DS
First, before even considering the prism, the right eye is going to be thicker at both the upper and lower edges. It’s twice the power of the left! Now, consider prism construction, it has a wide base. Prism will always add thickness in the direction of the base. Considering this, return to the above example, 8∆BD is going to add additional thickness to the lower edge of the right lens. The thickness disparity between the lenses will degrade lens cosmetics and increase the potential for distortion in the lens periphery.
Here is where splitting prism power using the rules of compounding can be beneficial. It allows us to “split” the prescribed prism power between the two lenses instead of having one thick heavy lens with a visible imbalance in thickness between the right and left lenses. Splitting the 8∆BD by applying 4∆BD in the right eye and 4∆BU in the left eye will “share” the thickness of the prism between the two lenses. This is more cosmetically appealing than one thick lens with prism and one thin lens without. The prismatic effect of splitting the prisms using the rules of compounding has the same effect as if all of the prism is applied to the right eye.
IMPORTANT RULES FOR SPLITTING PRISM
• Always get permission from the prescriber.
• Always adhere to compounding rules.
• Always make sure the direction of the
prism base as prescribed for the original
eye remains the same.
For example, OD: 16BD OS: PL
OK to split as OD: 8BD and OS: 8BU NOT
OD: 8BU and OS: 8BD
What are some of the conditions for which prism is prescribed? First, what does prism do? It shifts the image in the direction of the apex. Prism is prescribed for various reasons, with the most common reason being muscle imbalance and eye alignment issues from strabismus. It is also prescribed for convergence issues, hemianopia and other conditions. The purpose of the prism is to alter the path of light from the object so that the images viewed by both left and right eyes correctly correspond to the visual axis of the eyes. As an example: If a right eye has esophoria (tendency to turn inward), then base out prism will bring the path of light from an object “inward” to be inline with the eye’s deviated visual axis. This allows the right eye to see the same object as the left eye and form an image on its retina, closer in similarity.
Strabismus refers to misalignment, or deviation of the gaze or abnormal turning of the eyes, typically due to a muscular imbalance. The extraocular muscles of our eyes need to be able to maintain parallel alignment of each eye; both eyes need to be looking at the same thing in space and time. They control eye movement, in tandem, to ensure that any disparity between right and left retinal images is tolerable. This enables the brain to combine, or fuse, the separate images from two eyes into a single image—a process called Binocular Fusion.
The most common use of prescribed prism is to compensate for strabismus, a condition where the extraocular muscles cannot maintain a balanced alignment of the two eyes. Strabismus is a broad medical term describing eye deviations that can be broken down into: phorias—a tendency for eye turn, deviation; and tropias—a definite eye turn, deviation.
Eye deviations fall into two main categories:
1. Comitant—The most common in children. The deviation is constant, regardless of the direction of gaze, and
2. Incomitant—Deviation is always changing, depending on the direction of gaze.
The prefix of a phoria or tropia indicates the direction of eye deviation.
Eso = In (Esotropia or esophoria)
Exo = Out (Exotropia or exophoria)
Hyper = Up (Hypertropia or hyperphoria)
Hypo = Down (Hypotropia or hypophoria)
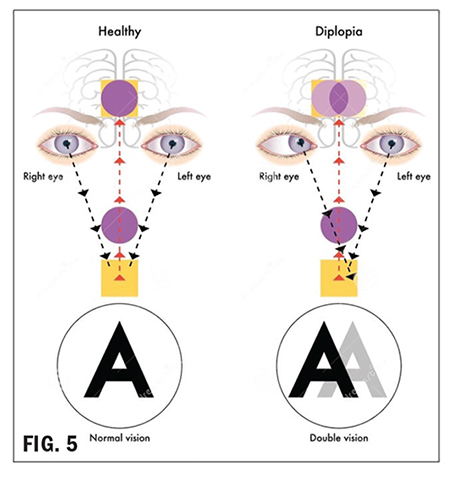
Strabismus can cause diplopia (Fig. 5). As stated earlier, extraocular muscles need to collaborate to make binocular fusion possible. If a muscular imbalance is present, resulting in strabismus, there can be an excessive disparity between the images each eye is sending to the brain, preventing binocular fusion. Ultimately, the brain “sees” and “reports” two separate images; hence, diplopia (double vision). When this happens during the years of eye development and is left untreated, the brain will often suppress (turn off) the weaker eye. The correctly functioning eye takes over, and input from the other eye is suppressed, a condition called amblyopia or lazy eye. In the past, it was thought that strabismus had to be treated roughly before age 7 to prevent permanent amblyopia. Now even adult amblyopes benefit from treatment.
To review, to add prism to a lens has the effect of shifting the image of an object being viewed in the direction of the prism apex; thus, with eye deviations, it reduces the disparity of images formed on the left and right retinas. This enables the binocular fusion of the two retinal images in the brain. The primary use of prescribed prism is to aid binocular fusion, NOT to fix muscular alignment issues.
Prescribed prism can also help improve quality of life for patients experiencing vision field loss due to neurological diseases such as a stroke or brain injury. These blind spots are known as Scotoma. Brain injuries or aneurysms, sometimes impact the occipital lobe of the brain, the area responsible for visual processing. These can result in visual field defects in specific quadrants, depending on the specific location of the injury.
Fig. 6 illustrates the visual field defect a patient experienced after a stroke. As you see, the patient has lost vision in their left hemisphere of both eyes. When prisms are used to treat such conditions, the conventional rules for compounding and canceling prism are no longer employed. The objective is to “shift” the patient’s gaze in a direction to attempt to “look around” the defect and perceivably “widen” their field of vision, improving their quality of life.
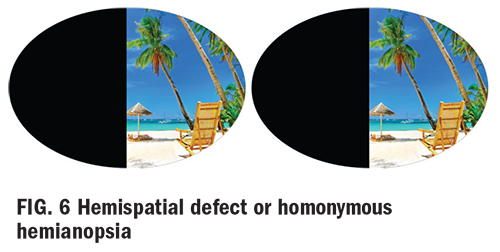
Example: In Fig. 6, the following prism may
be prescribed:
OD: BO
OS: BI
Generally, to accomplish the desired outcome, very high prism powers are required, which creates not only cosmetic problems but also a confusing visual environment in which objects unexpectedly appear and disappear from view.
Aesthetics and the Impact of Frame Selection with Prism
As a professional optician, always try to visualize the end product prior to fabrication. In a similar way to how lens thickness can be affected by PD, OC placement, frame dimensions and cylinder axis orientation, the base direction of the prescribed prism will also add thickness to the finished lens.
For example, presented with the following
prescription:
OD: PL sph 5BIOS: PL sph 5BI.
The thickest part of the lens will always be in the direction of the base. The base is the thickest part—makes sense? In this example, the lenses will be thickest at the nasal edge (BI OU).
Knowing this helps with frame selection:
• Keep frame PD as close as practically possible to the patient’s anatomical PD to minimize the necessary horizontal decentration.
• Fitting the patient in a zyl frame without nosepads will not only cover up some of the lens edge, improving the cosmetics but also eliminate the need to adjust the nosepads around the thick nasal edges.
• If anatomical features necessitate nosepads, the application of an edge roll at the nasal edge might help remedy the adjustment dilemma while also improving cosmetics.
Occasionally, I’m faced with a moderate to high prescription and a patient electing to go “bigger” in frame size, despite my begging and pleading. In this case, all I can do is reiterate my recommendations and forewarn them of the distortion they may experience in the periphery. I hope that this helps prepare them and avoid a negative first impression of their new eyewear. Aspheric designs can help reduce the effect due to a flatter angle formed as the eye rotates away from the optical center of the lens.
Antireflective coating: As stated earlier, prisms deviate light. It’s their job! Our real world presents the eyeglass wearer with omnidirectional light entering their lenses. Light entering the lens at oblique angles in an uncoated lens is going to scatter and reflect more from both the surface and internally, resulting in halos and ghost images that will be particularly apparent at night when driving into oncoming headlights. This effect will be exacerbated in the presence of a prescribed prism. The application of an antireflective treatment will minimize reflections and scatter to reduce eyestrain and fatigue, enhancing clarity and acuity—our primary objective.
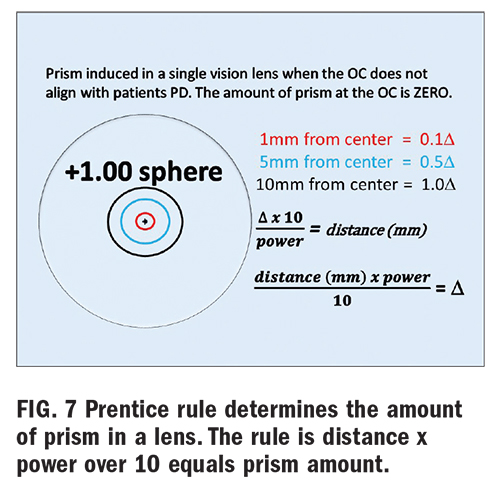
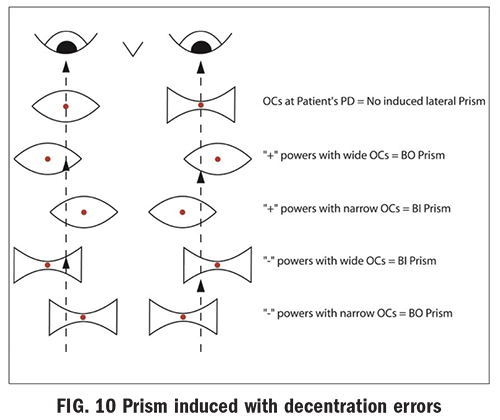
Nonprescribed prismatic effect of eyeglass lenses with centration errors (Fig.10): Prism occurs whenever there is a difference in lens thickness between two points on the lens. Because lenses with power always have a variation in lens thickness, prescription eyeglass lenses produce prismatic effects away from the optical center of the lens. At any point away from the optical center of the lens, a minus lens, which is thicker at the edge and thinner at the center, produces a prismatic effect with the prism base pointed away from the optical center. Conversely, a plus lens, which is thicker at the center and thinner at the edge, produces a prismatic effect with the prism base pointed in toward the optical center. The amount of prism at any point on a lens is directly proportional to the power of the lens and the distance from the optical center. Prentice rule is used to calculate the amount of prism present at any point in a lens.
Prism = Decentration (distance) x Power ÷ 10 (Example: +6.00 D x 5 mm = 30 ÷ 10 = 3 ∆D. This formula gives you the amount of prism, but we need to know the base direction. If this is a right lens, then the amount of prism 5 mm below the OC is 3D D BU in a plus lens. If we want to know the amount of prism in this same lens, 5 mm out from the OC it is 3∆ D BI.
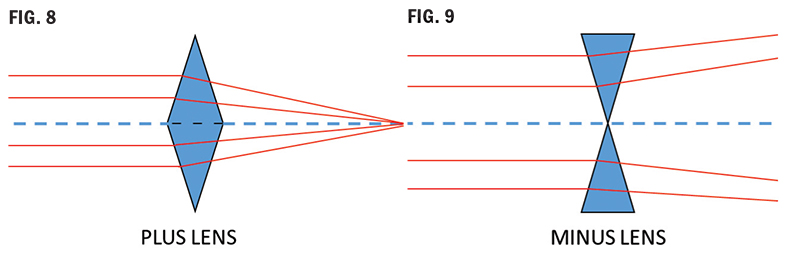
A plus lens (Fig. 8) is constructed of base to base prisms, and because light deviates toward the base, it emerges from a plus lens converging: plus power (vergence). Plus lenses are a base in configuration.
A minus lens (Fig. 9) is constructed of prisms arranged apex to apex, causing the light to bend toward the edges and emerge diverging: minus power (vergence). Minus lenses are a base out configuration. If you move a plus lens in front of your eye, you will see “against motion.” Do the same with a minus lens; you will see “with motion.”
Prism: Good or Bad?
What does prism do for our patients? As discussed earlier, it can be both beneficial if prescribed, but it can be detrimental if mistakenly induced in the patients’ ophthalmic lenses. How can prism be mistakenly induced?
Prismatic effect from horizontal decentration errors (OCs and PDs not aligned): Through the optical center of the lens, rays of light do not deviate and therefore produce no prism. (OC = ZERO prism). As the distance from the optical center increases, rays of light will be deviated by increasing amounts.
As illustrated in Fig. 10, misaligned PDs or OCs can induce unwanted prism, which can potentially cause vision problems and discomfort. These problems can present as distortion, headaches, a pulling sensation, eyestrain and fatigue and in severe cases, diplopia (double vision).
ANSI standards indicate the following prism tolerance limits: horizontal prism < 2/3 ∆ D and vertical prism < 1/3 ∆ D
In Part 2, we will address vertical prism imbalance in multifocal lenses and the effects of antimetropia or anisometropia.
Prism Verification
Now the job comes back from the lab, and it’s time to verify. You are verifying the correct prism amount and base direction, or you are determining the prism error in a lens. Take a deep breath, and here we go.
• Mark the lens OC.
• Viewing the lens through a lensometer, verify the prism through the OC, starting with the highest powered lens (most plus) first.
• Very important: Set the platform position to check the highest powered lens and DO NOT move it.
• Record vertical and horizontal prism present at this point in the first lens—the point of intersection of the middle line of the lensometer mires in each meridian.
• Switch to the opposite lens, keeping lensometer platform height unchanged.
• Verify prism.
• Record vertical and horizontal prism.
• Calculate net prism using rules for compounding and canceling prism and direction.
Note: The above procedure works for single vision and lined multifocal designs.
Verifying prism in a progressive addition lens (PAL):
In a PAL, the prism can be verified only at the Prism Reference Point (PRP)–the point below the fitting cross and horizontally centered 17 mm in from the two engraved circles. This makes verifying prism in a PAL much easier than other lens design—it is definitive!
1. Locate engraved circles and mark them.
2. Position lens over PAL cutout template (or locate midpoint between the engraved circles).
3. Mark the PRP position (the dot below the fitting cross and centered between engraving marks).
4. Read vertical and horizontal prism through this point (PRP) for both lenses and calculate net error/imbalance or verify the prescribed prism amount.
NOTE: Do not confuse the fitting cross with the PRP. Verify prism at the PRP and verify distance power at the distance reference point above the fitting cross.
Do not be surprised if you find vertical prism ground at the PRP, despite not being prescribed. This is likely due to prism thinning. Prism thinning is a technique utilizing equal amounts of vertical prism in the same direction in each eye, usually base down, to create additional thickness in the lower portion of a PAL to accommodate the steepening base curves necessary to provide the increase in add power. It can also be used to reduce edge thickness in a high minus PAL. Since it is equal in both magnitude and direction and relatively minimal, it does not adversely affect a patient’s acuity. Ground prism resulting in no net effect is known as yoked prism and will be discussed in greater detail in Part 3.
CONCLUSION
Congratulations, you have completed this basic introduction to the world of prism. We will build on this foundation in Parts 2 and 3. I hope you are feeling less intimidated, and for those of you who can’t get enough, I hope I’ve whetted your appetite, and you are eagerly anticipating more. Either way, I hope you will all join me for the upcoming Parts 2 and 3 of The Spectrum of Prism Optics.