|

Pupillary Distance
Lens fitting requires speed and control to ensure that the
patient maintains confidence from eye exam through dispensing.
If they sense that an optician is unsure of themselves
when taking measurements, there is no reason to
expect them to believe in the glasses if they need some
time to adapt to them. As a result, the best precision in PD
and fitting height is essential.
Fitting patient's precisely requires a calibrated pupillometer
handled well. The pupillometer measures the distance
between the visual axes (lines of sight) of the eyes and determines
the positioning of the lens optical axis. When they are
coincident, patients see best.
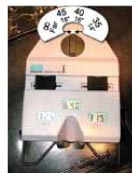 The pupillometer "lights up" the
point that the visual axis exits the
cornea. First, adjust the working distance
dial for far or reading, 45 for
18 inches, 40 for 16 inches and 35 for
14 inches. Center the paddle to measure
both eyes at once. Sit opposite the
patient; hold the pupillometer with
thumbs on the slides and place the
nose pads on the patient's nose, forehead bar centered and
against the head. Ask the patient to look at the light with both
eyes, blink when needed and move the hairlines to cover the
corneal reflex. When each hairline crosses the reflex, remove
the pupillometer and read either monocular or binocular value.
Refer to the PD & Height table for recommended centering. The pupillometer "lights up" the
point that the visual axis exits the
cornea. First, adjust the working distance
dial for far or reading, 45 for
18 inches, 40 for 16 inches and 35 for
14 inches. Center the paddle to measure
both eyes at once. Sit opposite the
patient; hold the pupillometer with
thumbs on the slides and place the
nose pads on the patient's nose, forehead bar centered and
against the head. Ask the patient to look at the light with both
eyes, blink when needed and move the hairlines to cover the
corneal reflex. When each hairline crosses the reflex, remove
the pupillometer and read either monocular or binocular value.
Refer to the PD & Height table for recommended centering.
Pupillometers are the preferred measuring method since they
eliminate parallax errors, take monocular measurements easily
for any variety of working distances even on a very dark iris. All
staff, even the newest trained can develop accuracy, consistency
and demonstrate use of a sophisticated instrument. In addition,
use the paddle to occlude one eye for patients with strabismus,
the zero line can be used for vertex distance measurements.
Take a new PD every time a patient is in the dispensary.
PD’s widen throughout life. It is another contact between you
and the patient and it demonstrates care and precision.
Clean the nose pads after each patient with an alcohol
wipe and calibrate often. To verify accuracy, set the PD to
32/32 and place a ruler against hairlines. Measure the distance
between them and confirm 64. If it is incorrect, note
the difference, measure again at 29/29 and 35/35. If the
pupillometer is off the same amount in each case, remember
to adjust the measurements taken to correct them until
the pupillometer can be sent for calibration. If the readings
are different and there is no consistency for all 3 measurements,
stop using the device; send it for repair and calibration
and use a penlight and ruler to measure PD. See the
Opticians' Handbook 2005 Edition at www.2020mag.com.
Segment Height Measurements
Precise segment and progressive fitting heights, first time,
teach patients that you understood their vision needs as well
as considered the height in their old glasses, their posture,
work, leisure and driving needs. Ask questions to discover
what the old glasses didn’t do well because the height was
off. One height will meet most but can’t work for all needs so
learn the activities for which the glasses will be used most
often or where the most comfort is required. Counsel that
another pair of glasses, for those other tasks would be better.
For example, a pair of progressives for all day wear deliver
vision at all needed distances but probably won’t work as
well for reading in bed. A pair of single vision readers or near
variable focus lenses would work better.
 To measure multifocal fitting
heights, sit opposite the patient,
adjust the frame so that it is
straight and comfortable for the
wearer. Ask the patient to put on
the glasses where they are comfortable
wearing them. Then, with your eyes at the same height
as the patients dot the fitting height with a marking pen. For
bifocals and trifocals, the starting points are top of lower lid for
bifocals and top of lower pupil margin for trifocals. For progressives
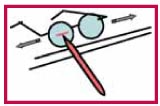
it is pupil center. Next, remove the glasses and draw
a straight line (about an inch) across the dot. Place the pen
against the table edge, dot against the pen and slide the
glasses right and left. See the illustration. To measure multifocal fitting
heights, sit opposite the patient,
adjust the frame so that it is
straight and comfortable for the
wearer. Ask the patient to put on
the glasses where they are comfortable
wearing them. Then, with your eyes at the same height
as the patients dot the fitting height with a marking pen. For
bifocals and trifocals, the starting points are top of lower lid for
bifocals and top of lower pupil margin for trifocals. For progressives
it is pupil center. Next, remove the glasses and draw
a straight line (about an inch) across the dot. Place the pen
against the table edge, dot against the pen and slide the
glasses right and left. See the illustration.
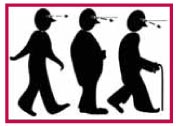 Ask the patient to put the glasses back on and ask them to
stand. From the side view their line of sight so that for progressives
they are looking through the line, for bifocals and trifocals
above it. For bifocals and trifocals, hand the patient a
reading card and as they look down, it is easy to see if they
look below the line. Check it again while sitting. In bifocals and
trifocals, it can also be confirmed by placing a piece of scotch
tape across the line. The tape should be completely in the way
for reading and out of the way
for distance and walking.
Watch a patient’s posture as
they walk with you around the
office. Adjust segment height as
needed. Also, a patient’s posture
changes as they age so take that
into consideration. Never assume that the previous height will be
good for the new glasses. Ask the patient to put the glasses back on and ask them to
stand. From the side view their line of sight so that for progressives
they are looking through the line, for bifocals and trifocals
above it. For bifocals and trifocals, hand the patient a
reading card and as they look down, it is easy to see if they
look below the line. Check it again while sitting. In bifocals and
trifocals, it can also be confirmed by placing a piece of scotch
tape across the line. The tape should be completely in the way
for reading and out of the way
for distance and walking.
Watch a patient’s posture as
they walk with you around the
office. Adjust segment height as
needed. Also, a patient’s posture
changes as they age so take that
into consideration. Never assume that the previous height will be
good for the new glasses.

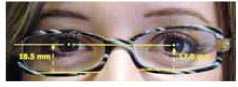
Dissimilar Fitting Heights
Eyes are at usually different heights. For centering, this should
be taken into account as follows. In progressives, order dissimilar
fitting heights. This is especially important for today’s
shorter corridor lenses. For example, in a 14mm minimum fitting
height lens, the corridor is about 10mm long. Therefore, a
+2.00D add lens would be changing about 0.2D per mm as the
eye moves down
the cor r i d o r. I n
glasses where the
fitting height is 2
mm different and
both eyes are fit to the lower height, the power of the lens for
the higher eye can be 0.4D less than the other eye. As a result,
the patient will say that they read clearer with the lower eye.
That’s because the other eye doesn’t have enough add power.
In addition, the PRP will be located at dissimilar heights so take
this into account when verifying prism. The same will be true
with computer lenses. Therefore, order lenses
with dissimilar heights.
 For visible multifocals and single vision. The
OC height is typically delivered with equal
heights and located at frame midline. For powers
above 5 diopters on patients with >1.5mm
difference in eye height, consider dissimilar
OC heights to improve their vision and better
equalize any prism induced. For visible multifocals and single vision. The
OC height is typically delivered with equal
heights and located at frame midline. For powers
above 5 diopters on patients with >1.5mm
difference in eye height, consider dissimilar
OC heights to improve their vision and better
equalize any prism induced.
Vertex Distance and Tilt
As increased precision is integrated into lens
design, the delivery of the exact prescription is
affected by the way that the lenses are positioned
in front of the eyes. The distance that the lenses
are from the eyes (lens back surface to the front
of the cornea) and their tilt can change the way
they work. For low powers, it’s not usually an issue
but for high powers, it can make a difference.
For example, in the Rx -8.00D sphere, add +2.00, if refracted
at 15mm and fit with a small frame that fits close at 11mm,
the lens -8.00 would be a different effective power when worn
closer. The power changes about D2/1000 for every mm
moved. Lenses moved closer to the eye get more minus, away
become more plus. Therefore, a -8.00 worn 4mm closer would
be 82/1000 = 0.064 per mm x 4mm or 0.25D more minus.
This means that the lens would see as if it were -8.25.
Distance vision may not be a problem. However the effect
would be 0.25D more minus on the add power also so the
patient would now be looking through a +1.75 add, too weak
and often have to be rechecked by the doctor with lenses
being remade. Precision up front could have considered the
effect and avoided a remake.
Tilt changes the effective sphere, cylinder and axis of prescriptions.
The effect is noticeable when extreme or in highpowered
lenses. A tilt of about 10 degrees is preferred, especially
for progressives.
{Sponsored by Essilor of America and Luxottica Group}
www.varilux.com • www.crizalpro.com • www.luxottica.com
|