

By Palmer R. Cook, OD
“Heroes are made, not born,” is a saying popularized by cartoonist J. R. Williams in the middle of the last century. This may be debatable, but the star performers in my own practice and in many other practices are proven ophthalmic care heroes, and they often share certain traits. These traits commonly include: a strong interest in helping the patients with whom they work, a solid attention to detail and an enthusiastic approach to each day.
These star performers often are very effective in recognizing patient/practice problems before they become epic in scope. They also tend to be interested in developing an understanding of more than the superficial details of how their work relates to the needs of the patients they see. Most of all, they find their work challenging and personally rewarding beyond their bi-weekly paycheck—but of course, that’s important too.
We all would like to have as many star performers in our practices as possible. When someone joins your staff, they might not realize that they may be starting on a potentially interesting and a surely challenging road. You can help make that a road that leads to a satisfying career if you nurture that person’s interest with basic training that includes more than a description of duties and expectations.


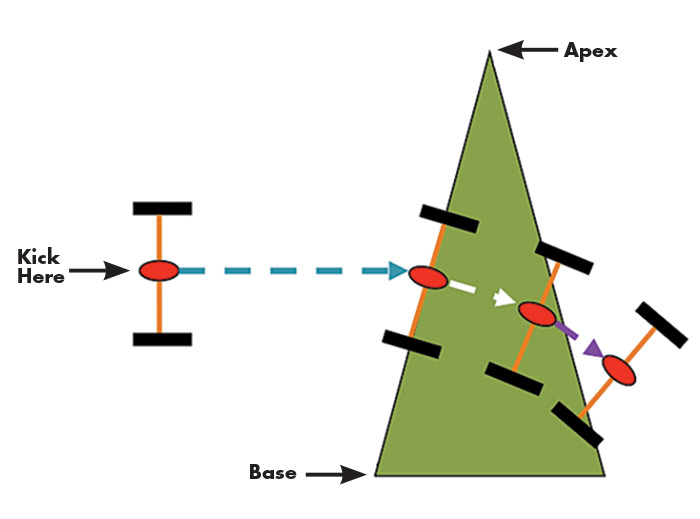
FIGURE 1
Two wheels connected by an axle are lying in a parking lot to the left of a triangular grassy area. If you give the axle a kick in the center, it will roll toward the grassy patch. The lower wheel strikes the grass first and is slowed down, but the momentum of the upper wheel (still on the pavement) rolls easily, and so the axle twists clockwise. A bit further on both wheels encounter the grass, and another kick causes the axle to move parallel to the left edge of the grass (shown by the white arrow). The upper wheel rolls more easily as it emerges from the right edge of the grass and the axle moves at a more downward angle (shown by the purple arrow) because the upper wheel is not encountering the resistance of the grass.
The orange axle represents a wave front and the blue, white, and purple arrows represent the way light rays would be drawn to show the direction in which the wave front would travel as it enters, passes through, and leaves the “prism.” The triangular yard is the shape of a prism, and the grass is the factor (similar to the index of a prism) that slows the wheels.

FIGURE 2
These lens prescriptions are both for lenses with identical powers. Most optometrists prefer to write lenses in the left-hand format (i.e., minus cylinder form). Ophthalmologists often prefer the right-hand format (i.e., plus cylinder form). Both formats are appropriate, and the conversion from one format to the other is fairly simple. The process, called “transposition,” is something that you may need to learn after your basic training.
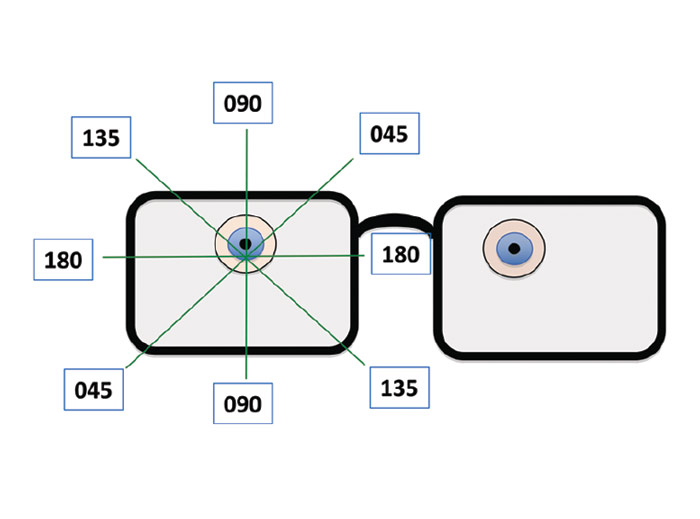
FIGURE 3
Lenses are mapped by a grid system (shown here in green). For clarity, only 4 meridians are shown here. Moving counterclockwise from 180, the next meridian would be 001, then 002, etc. The grid is centered on the Major Reference Point (MRP), which is the one point in the lens that gives exactly the needed prescription. In most cases the MRP is also the optical center (OC) of the lens, and it is usually placed below the center of the pupil. The left eye in this case is not on the same level as the right. This is called a left hypo, or right hyper eye, and when the left lens is designed, the MRP of that lens will be located lower for this rather common (but sometimes overlooked) anatomical anomaly.
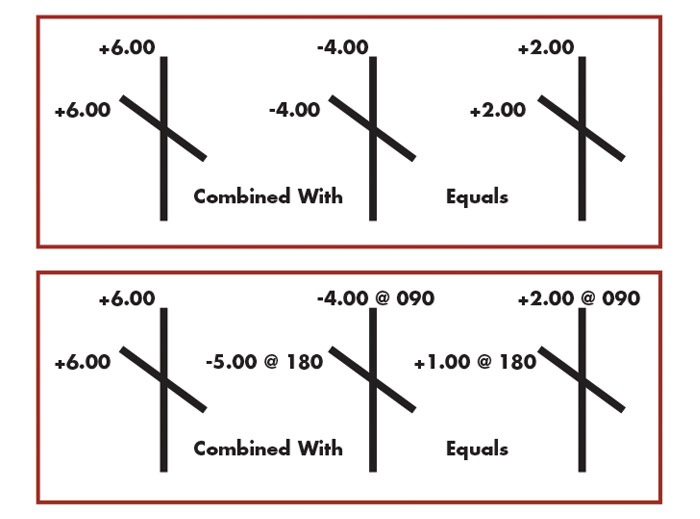
FIGURE 4
In both upper and lower diagrams, the first cross on the left represents the front surface of a lens. The front surfaces of both are spherical so the vertical (90th) and the horizontal (180th) meridians are shown with the same power (+6.00). This indicates that the power in all meridians of the front surfaces are the same. In the upper diagram, the second cross, which represents the back surface of the lens, is also spherical (-4.00), so by combining the +6.00 with the -4.00 indicates that the total power of the finished lens will be +2.00 in all meridians.
In the lower diagram the front surface of the lens has a +6.00 curvature in all meridians so it is a spherical surface. Because this patient needs more power added to the vertical meridian, and less power needs added to the horizontal meridian, the optical shorthand is telling us that the patient has astigmatism, and the back surface of the lens must have less minus power (-4.00) in the vertical (90th) meridian, and more minus power (-5.00) in the horizontal (180th) meridian. The @ symbol for the cylindrical back surface of the lens indicates the meridian where the power is located. The axis would be 90 degrees from the power at 180.
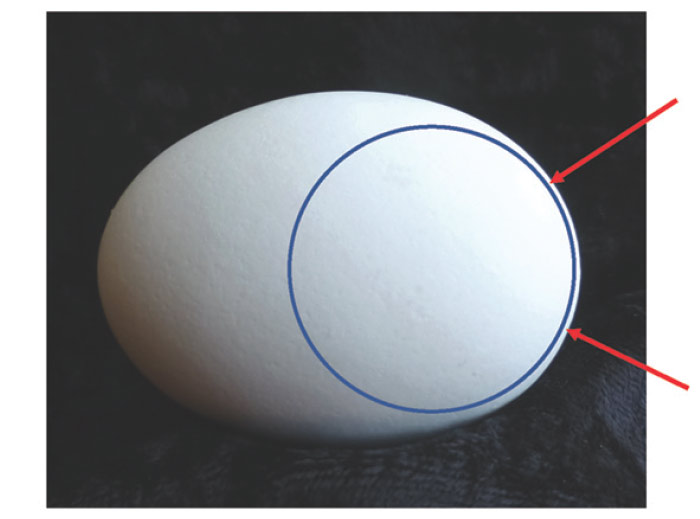
FIGURE 5a
This blue circle is superimposed on the side view of the egg near its base. It shows the spherical shape of the end of the egg (between the red arrows). Outside the zone indicated by the arrows, the gap between the edge of the spot and the egg grows increasingly wider because in that area the egg has an increasingly flat (aspheric) curvature.
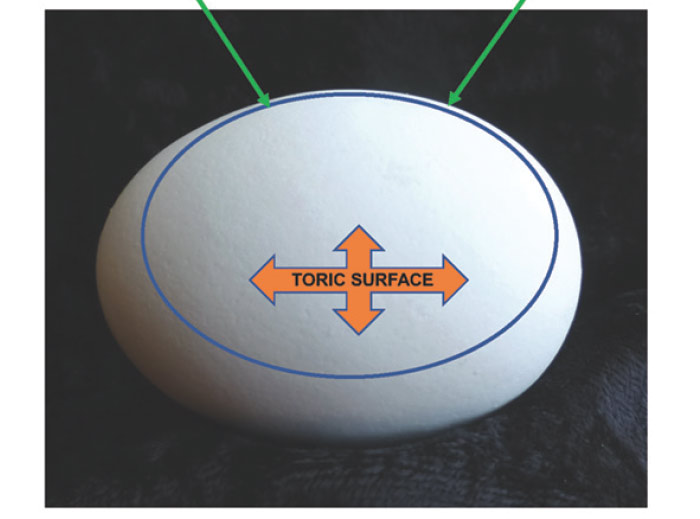
FIGURE 5b
The blue oval in shape parallels the part of the egg between the green arrows. The curvature of the egg, except for its ends, is aspheric. An aspheric curve cannot be drawn with a compass, which is made only for drawing circles. The horizontal orange arrow is the flattest meridian of the egg’s middle surface, and the vertical arrow is the steepest meridian. Lenses with toric surfaces are used to correct astigmatism, and their flattest and steepest curvatures are always 90 degrees apart.
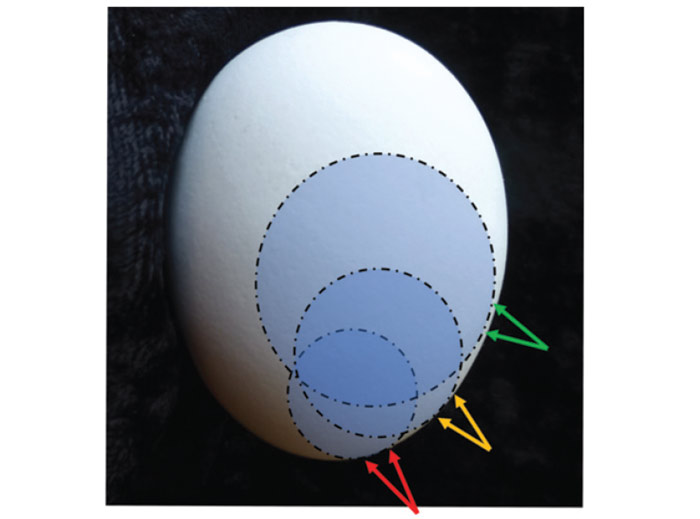
FIGURE 5c
The egg is rotated narrow end downward. Starting with the largest circle, the green arrows show the area at which a circle will more or less parallel the edge of the egg’s outline. To similarly parallel the outline (orange and green arrows) as you look downward along the edge of the egg, smaller and smaller circles must be used, showing that the curve of the egg is progressively getting steeper. Progressive addition lenses, sometimes called no-line multifocals, progressive addition lenses, or PALs utilize this same steepening-curve effect.
This design increases the plus power on the front surface of some lenses so that the patient can see clearly at near when looking downward. The section of curvature marked by the green arrows is flatter for distance viewing. The yellow arrows mark a somewhat steep curve that would give more plus power for mid-range distances, and the red arrows indicate a steeper section of curvature which would add additional plus power for near work
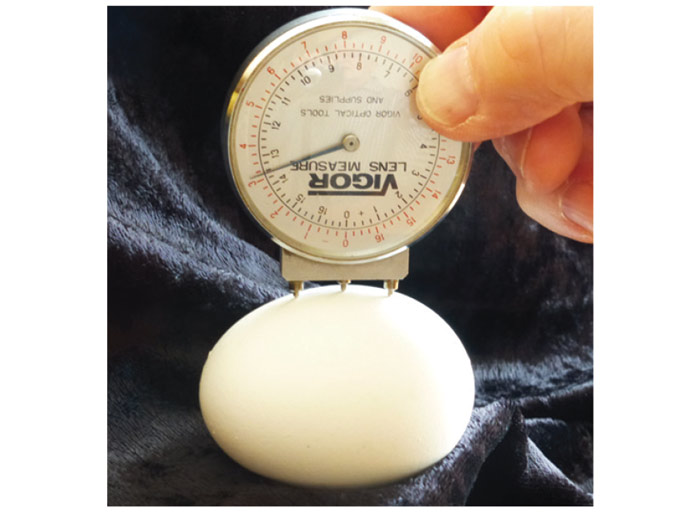
FIGURE 5d
An ordinary chicken’s egg has spherical surfaces at each end that clearly show the difference between steeper curvatures and flatter curvatures. The egg also presents toric surfaces with at least one axis that is aspheric, and the other that is spherical. Viewed in profile and properly oriented, the egg presents an example of a plus curvature that gradually steepens in a way similar to the steepening of the front surface of a PAL with a front surface add.
A lens clock can help your student visualize some of the kinds of curved surfaces that are used for prescription lenses. Here a lens clock is placed so that its pegs align with the flatter curve of the egg’s toric side-surface. If the lens clock were to be rotated around its center peg, the indicator would move clockwise showing that the curve being measured is steeper. For clarity’s sake, allow the student to handle the lens clock, and measure the curve of a flat glass plate, and the plus side of a spherical lens prior to your presentation of the egg’s curvatures.
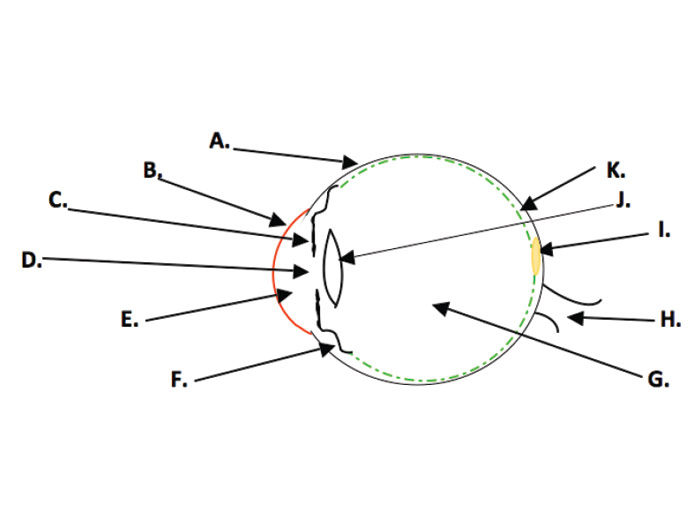
FIGURE 6
The gross anatomy of the eye includes the Sclera A (the “white” of the eye); the Cornea B, the clear, pain sensitive “window” of the eye; the Iris C, which can vary the size of the pupil to help the eye adapt over a wide range of bright or dim conditions; the Pupil D, which improves the optical performance of the eye; the Aqueous E, the pressurized watery liquid that keeps the eye inflated; the Ciliary Body F, which produces the Aqueous, and which is a muscle that can change the optical power of the eye during the first 4.5 decades of life; the Vitreous G, a transparent jelly-like structure filling most of the cavity formed by the shape of the eye; the Optic Nerve H, which transmits the electrical pulses which the brain interprets as vision; the Fovea Centralis I, a cone-rich pit in the retina which gives the ability to discern fine detail and color; the Lens J, which is re-shaped by the action of the Ciliary Body (until we are in our mid-40s) to increase the optical power of the eye for viewing near objects; and the Retina K, which converts light energy into electrical energy.
HOW IT CAN HAPPEN
Your new hire was chosen on the basis of personality, ability to work well with others, a work history that included good attendance, ability to handle complex tasks, some computer skills and strong recommendations from previous employers. She had researched eyecare enough to demonstrate some knowledge of the three Os when interviewed. But she had neither experience nor training in eyecare. You feel that she has good potential to become a key member of your staff and a long-term asset to your practice. She is a prime candidate for basic training.
ORIENTATION
Whether a new hire is new to eyecare or not, an orientation including a rules-of-the-road discussion about office etiquette and performance expectations with the office manager or owner is a good first step. This can be followed by a combination of a “shadowing” of various staff members so the new hire can observe, several periods of one-on-one orientation with other staff members describing their skills and duties, and some regularly scheduled basic training sessions. Even if a new hire has previously worked in an eyecare practice, don’t assume that he or she has the depth of understanding that will serve your practice well. Every employee deserves some form of orientation when they come on board, but an orientation is a different sort of training that usually does not include much foundation information.
LENS BASICS
Lenses are used in eye exams. Patients purchase and enjoy the benefits their lenses provide. Prescriptions are written for lenses. It makes sense that anyone new to your practice might want to know some basic information about these useful and often misunderstood products.
The universe of vision care can be confusing, baffling and seemingly contradictory at any level. At the entry level, these problems can seem exponentially amplified. There is no simple starting point. However, if you begin with a couple of spherical lens blanks, one around a +6.00 and the other about a –6.00, a square plano prism of about 2Δ and a laser pointer, your student will be less apprehensive than if you began with an anatomical model of an eye, or a series of slides showing the visual pathways. After all, lenses are just curved pieces of clear material with no wires, buttons, gears or circuit boards.
You might begin by pointing out that all lenses for vision problems are either plus lenses, which add power to the eye, or minus lenses with subtract power from the eye. Or in some cases, they are plano (or zero optical power) lenses that neither add nor subtract optical power from the eye, but which are used for eye protection or filtering purposes.
Plus lenses are always thicker in the center and thinner on the edges, and minus lenses are always thinner in the center and thicker on the edges. When your student handles your lens samples, it will be easy for him or her to see this very basic fact of lens anatomy. It’s important to keep in mind that up to this point, your student, just like most people outside of our industry, sees all glasses as being essentially the same (except perhaps for cost and the style of the frame).
Cut two notches 180 degrees apart in the lip of a plastic foam coffee cup. Then put a laser pointer in the notches taped or wrapped by a rubber band so the light stays on. Draw a black circle about the size of a quarter in the center of a piece of copy paper, and tape the paper on a wall a few feet from your desk positioned so the laser light is centered in the circle.
Let your student know that the optical center of any lens is the point that gives the best optical performance the lens has to offer. Also, light passing through the optical center of a lens is not bent. This is easily demonstrated by holding the lens so that the laser spot stays within the black circle. If the lens is minus power, the laser spot will move to the left as you move the lens to the right, and to the right as you move the lens to the left (“against motion”), and when the plus lens is demonstrated “with motion” will occur. If you position the lens so the laser beam is in the black circle, that beam will be passing through the optical center of the lens. The light is always bent more and more toward the thickest part of the lens as the laser ray moves further away from the optical center. This an ideal way to introduce the concept of prism and the relationship of the lens’ power to the prism effect away from center (i.e., Prentice’s Law).
The above demonstration opens the door to explaining how patients with eye-aiming problems can be given lenses with prism to reposition whatever they are viewing so that it takes less effort to use both eyes together as a team. Use the plano, square prism to show how the laser spot jumps when the light passes through it. Then give your student some reading material, and put the prism (BO) in front of one of her eyes. She will probably notice little interference with her reading when you do this. Then as she continues reading, place the prism again in front of one of her eyes, but this time base up (BU) or base down (BD). Point out that the same prism worked quite differently depending on its position. Most people find this demonstration memorable. It is a demonstration that clearly shows the impact of an eye muscle problem or an incorrectly fabricated lens.
You might also show how objects seen through a plus lens move in a direction opposite to the movement of the lens, and for minus lenses the objects will move in the same direction as the lens. This gives another method for identifying whether a lens is either plus or minus.
PRISM
The speed of light is constant. It travels at about 186,000 miles a second. But that is only true in a vacuum. When light travels through other materials it slows down. For example, a standard plastic lens will slow light down to a little over 124,000 miles per second when the light ray enters the lens. That ray will poke along at that reduced speed until it exits the other side of the lens. As it exits, it performs one of nature’s most mysterious tricks of putting the pedal to the metal and speeding right back up to 186,000 miles per second. See Fig. 1 to visualize how this makes a kind of lens called a prism work.
The top of the “yard” which represents a prism in Fig. 1 is called the apex of the prism, and the wider part at the bottom of the prism is called the base of the prism. Light entering a prism is always bent toward the base of the prism. Prisms are most often prescribed when the eyes don’t aim properly. When eye aiming is a problem, one eye usually points toward what the person wants to see, and the other eye points in some other direction. In such cases, prism lenses, because they change the direction of the light flow, can be used so that even though the eye is turned, the image is moved to allow both eyes to view the same object.
LENS PRESCRIPTIONS
Lens prescriptions are usually just power formulas that tell how much optical power must be added or subtracted from each of the patient’s eyes (Fig. 2). The OD notation stands for “right eye” and comes from the Latin term oculus dexter. The right eye is listed first. OS stands for “left eye” from the Latin, oculus sinister. The first set of numbers moving from left to right are called the sphere power of the lens, with a minus sign indicating optical power was overall to be subtracted from the eye and with a plus sign indicating optical power was overall to be added to the eye. In some cases, an expiration date is included, beyond which the prescription should not be refilled. Some optometric state boards require that a PD must be given, although this is seldom the monocular PDs that should be used for eyewear fabrication. Monocular PDs are not needed for eye exams, and they can only be measured correctly after the frame has been fitted.
If there is a second set of numbers followed by an “x” in the lens formula, they will always be minus if the prescription is written in minus cylinder form. In plus cylinder form, any second set of numbers followed by an “x” will always be plus. A simple cylinder will have no power in its axis meridian, and it will have its maximum power 90 degrees from the axis meridian. If you think of a roll of paper towels lying on a table, the steepest curve of the roll will be vertical, and the flattest contour of the roll will be horizontal. If you want to spin the roll to release some towels, you can use a broomstick as an axle (or axis) around which the roll can spin. The symbol “x” stands for axis in lens formulas, and the next set of numbers to the left would be the meridian (Fig. 3) in which the doctor wants the axis of the cylinder to be positioned (a horizontal axis would be a line running from 0 to 180 on a protractor, but for lenses and eyes the horizontal axis is always marked 180. For axis positions from 001 through 099, three digits should always be used. Otherwise, the optician may be unsure if 18 or 180 was intended, or if “1” should have been 100 to 180, 010 to 019, or 001. People get interrupted in a busy office so be wary if three digits aren’t there.
The numbers that are followed by a Δ symbol, indicate that the patient needs prism which is usually prescribed to give patients comfortable binocular vision. BI means the prism should be oriented with its base inward toward his nose, and BO means the prism should be oriented with its base turned outward, away from his nose. BI and BO prisms are called lateral prisms, and when they are used they are most often BI in both eyes or BO in both eyes. BD means the base of the prism should be downward, and BU means the base of the prism should be upward. BD and BU prisms are called vertical prisms, and if BU is specified in one eye, most often, BD will be specified in the other.
The final part of many prescriptions is the Add. The Add notation tells the optician that the patient needs more plus power or less minus power for close work. An Add is sometimes prescribed for children to relieve eye muscle problems related to over-convergence while reading.
Interestingly, the custom of shaking hands, which dates back to the time of ancient Greece, tied up the right hand, leaving left-handed people an opportunity to draw a short sword or dagger. Could that be the reason sinister grew into a word indicating evil or threatening? For our purposes, the left eye is neither more nor less sinister than the right, other than for its name.
LENS MATERIALS
All staff members should have some understanding of lens materials. We no longer live in an eyecare world of either plastic or crown glass. There are many fine ophthalmic lens materials on the market. Patients who all want: A. To See Well, B. To Look Good, and C. To Be Comfortable, can be benefited by a careful selection of the best material for their needs.
Crown glass is the most scratch resistant material, but it is approximately twice as heavy as the most widely used plastic lens material (1.49 or standard plastic). Among the plastic lenses the Trivex, Trilogy and Phoenix family of materials from PPG are the lightest weight choice for prescriptions between about -11 to +12 diopters in power, but in the highest powers they are thicker than some other materials. Polycarbonate (poly) and the Trivex materials are similarly impact resistant. Poly has higher reflectance and lower optical performance, and Trivex materials are more costly to produce, but they perform better optically.
For higher powers of lenses, the materials with indices of 1.60, 1.66/1.67, 1.74 and even higher will have increased reflectance, but as you go up the index scale, each step higher also means some reduction in thickness. Sketching a diagram similar to Fig. 1 can help your student visualize how lens materials bend light. The small grassy area that impedes the wheels in this diagram would have grass like the greens on a golf course for a low index material, grass similar to a yard in need of attention for mid-index materials and perhaps foot-high weeds for a really high index material. The benefit of the higher index materials is that they have more “light bending muscle,” and therefore, the lenses can be made thinner and with less highly curved surfaces. Of course, the difference between a simple prism with flat lens surfaces and a lens with refractive power is that parallel rays entering the prism will emerge deviated, but still parallel, while parallel rays entering a lens with refractive power will emerge converging or diverging.
It can be helpful at this point to describe the map that identifies the 180 meridians of both the eye and all ophthalmic lenses (Fig. 3). This is a more or less painless way of introducing the concept of toric curves and the dreaded term, astigmatism. Although you are not laying the groundwork to make your new staff member an optician, explaining the Major Meridians of toric lenses can open the door for using optical crosses to represent lenses. This is a shorthand that most people find easy to understand (Fig. 4). Every lens that is used for correcting astigmatism has two major meridians. One is the meridian of the axis of the cylinder, and the other is located 90 degrees from the axis of the cylinder.
THE EGG AND EYE
The rounded bottom of a chicken’s egg nicely shows a spherical curvature (Fig. 5a), and the other end of the egg is also spherical, but much more steeply curved. The surface of an egg about halfway from one end to the other is clearly a toric surface similar to the shape of the cornea’s when with-the-rule astigmatism is present (Fig. 5b). The principle underlying how plus power is added to PALs for reading is shown in (Fig. 5c). Although a chicken’s egg has steeper curvatures than most ophthalmic lenses, a lens clock can be used for demonstration purposes (Fig. 5d).
OCULAR ANATOMY AND FUNCTION 101
The optical portion of the eye includes the cornea, pupil, lens and the transparent aqueous and vitreous. The retina, which lines the inside of the eye, functions as a transducer(Fig. 6). Transducers convert one form of energy into another. In the retina, optical energy is transformed into electrical energy which is then transmitted via the optic nerve and other structures to the areas of the brain that provide us with a construct of the world around us.
In order to send electrical impulses that allow the best percept of the external world, a clear image must be formed on the retina. For a “normal” eye, that means that the light rays from about 20 feet or more away must be bent by a total optical power of about 62 diopters. The cornea supplies about 42.5 diopters of the needed power, and the lens of the eye supplies about 19.5 diopters of the remainder.
REFRACTIVE ERROR
The primary motivator causing people to seek eyecare in the U.S. is probably refractive error. Refractive error includes myopia (nearsightedness), hyperopia (farsightedness), astigmatism and in the strictest sense presbyopia. Refractive error means that the optical parts of the eye do not form a clear image on the retina when the focusing mechanism (accommodation) is relaxed. This can be due to the optical power of the eye being too strong, or too weak in some or all of the meridians of the eye. If the optical power of the eye is inappropriate, the refractive error is termed a refractive refractive error. If the eye is physically too long or too short from front to back, the condition is called an axial refractive error. Spectacle lenses, contact lenses and surgery have all been used to correct refractive error.
PHORIAS AND TROPIAS
There are six eye aiming muscles wrapped around each eye. They are called the extraocular muscles. Four of these muscles primarily turn the eye upward, downward, to the right or to the left. The other two muscles primarily rotate the eye clockwise or counterclockwise. If for any reason these muscles do not work well as a team, your patient will have to use extra effort to aim both eyes properly. This condition is called a phoria. If you cover one eye as you look at a clock across the room, that eye may stay perfectly aligned with the other eye, but for most people it will drift to a position of rest, perhaps a bit to the right, left, above or below the clock you are viewing. If you then move your hand to cover the other eye while still looking at the clock, you may see the clock apparently jump a bit toward the right or left, or even upward or downward. A small amount of movement indicates a tendency, which you are controlling by the use of your extraocular muscles, for one eye to turn from your intended direction of gaze. Small amounts of phoria do not cause problems and don’t require treatment. Moderate amounts of phoria can cause ocular discomfort, reading problems and avoidance of prolonged tasks requiring close visual attention. Certain kinds of eye exercises or prism lenses, or both may be needed if the phoria causes problems.
A tropia is a condition in which the eye muscles or the nerves supplying them cause one eye to be primarily used for vision and the other deviates so that it is not pointed at the same object of regard as the preferred eye. Tropias are sometimes correctable with special eye exercises, the use of prism or eye muscle surgery. Often a combination of these approaches is needed to correct the tropia. Another word for tropia is strabismus. Tropias can be constant, intermittent or alternating (i.e., sometimes the right eye is preferred, and other times the left eye is preferred). Tropias can be small angle (i.e., the eyes are nearly in alignment) and hard to detect, or wide angle in which the condition is obvious and often cosmetically unacceptable. In medieval times a drifting eye was sometimes referred to as an “evil eye.”
APOLOGIES, THOUGHTS AND SUGGESTIONS
First, my apologies to experienced and vision care savvy readers: As you are already aware, there is considerable “rounding” and simplification of the information presented here. The above comments are to help you orient someone entering an eyecare practice. Make your basic training manageable for your student. Although this is familiar ground to you, a lengthy session could leave your new employee feeling as though he or she had been trying to drink from a fire hydrant.
Approach the material as a discussion, and give plenty of opportunity for your new employee to ask questions. Inject your own experience into the discussion, and be sure your student knows there is no expectation of all the material being completely absorbed. Ask a few questions as you go through each part of the material, and pace your presentation accordingly. Once-over-lightly as you do a series of 30 to 45-minute sessions is a good rule. After 90 days on the job, when roots have begun to sink in, you can repeat and elaborate as a refresher. Hopefully, you will see the emergence of a new eyecare hero starting within your practice.
ACCOMMODATION: The lens of the eye is designed to change shape so that the eye’s optical power is increased for seeing close objects. This process is called accommodation. Accommodation results from contraction of the ciliary body which allows the lens to change to a more curved shape (i.e., provide more optical power to the eye).
Astigmatism: This is a condition in which the contours that make up the images that should fall flat on the retina are focused at varying distances from the retina. Moderate to larger amounts of astigmatism cause blur, but astigmatism in smaller amounts may cause strain with relatively little blur.
DIOPTER: A diopter is a unit of light bending power. One diopter is the amount of light bending power that can bend parallel rays of light to a focus 1 meter (about 39 inches) from the lens. All lenses, eyes and optical instruments have light bending power measured in diopters.
HYPEROPIA: Commonly called “farsightedness,” this is a condition in which the image of distant objects formed by the eye, when accommodation is relaxed, is blocked by the back of the eye before it can come to a focus. Hyperopia causes strain at all distances, especially for near work. Hyperopia can be associated with reading difficulties, ocular discomfort and frequent styes or lid infections.
INDEX: The light bending power of every lens material is assigned a number (e.g., 1.49, 1.53, 1.60, 1.66, 1.67, 1.70, 1.74, etc.) that gives its ability to bend light of a given wavelength. A lower index number means a lens of a given power and shape must be more steeply curved and have greater volume than if it were made of a higher index material.
Myopia: Commonly called “nearsightedness,” this is a condition in which the image of distant objects formed by the eye, when accommodation is relaxed, falls in front of the retina. Myopia causes blur at far distances, but near vision may be clear.
PD: The PD is the shortest distance between the points at which the right and left lines-of-sight intersect the lenses of a properly adjusted frame when the patient’s level lines-of-sight are parallel and an object on the patient’s mid-line is being viewed.
NEAR PD: The near PD is the distance between the points at which the right and left lines-of-sight intersect the lenses of a properly adjusted frame when the patient’s lines-of-sight are directed at an object on the patient’s mid-line and which is located at a comfortable distance for near work (usually 40 cm).
HALF PD: The half PD is the distance from the center of the bridge of the properly adjusted frame to the point at which the line-of-sight intersects the lens when a distant object on the patient’s mid-line is being viewed.
MONOCULAR PD: The monocular PD is the shortest horizontal distance from the point at which the line-of-sight intersects the lens to a vertical line extending downward from the center of the properly adjusted frame when an object at near (usually 40 cm from the spectacle plane) and located on the patient’s mid-line is being viewed.
OPTICAL CENTER: The optical center of a lens is that point in a lens through which an entering ray at right angles to the lens surface will pass undeviated.
PRISM: A simple prism causes light rays to change direction (Fig. 1), but does not bring light to a focus. Objects viewed through a prism appear to be displaced from their real location.
PRISM DIOPTER: A prism diopter is a unit of measurement used to indicate the amount of deviation that occurs when light passes through a prism. A one prism diopter prism (1Δ) deviates a light ray 1 cm at a distance of 1 meter from the lens.
Prentice’s Law: This law states that a light ray passing through a lens will be deviated by an amount in prism diopters equal to the distance in centimeters from the optical center of the lens to the point of intersection at which the ray enters the lens times the power of the lens in diopters. For example, if a light ray enters a 4.00 diopter lens 1 cm from the optical center, it will be deviated by 4 prism diopters (1cm x 4.00 diopters).
PRESBYOPIA: The lens, which grows layer upon layer as birthdays pass, eventually loses its ability to reshape (accommodation) enough to allow clear vision at normal reading distances. This usually is first noticed in the fourth decade of life, and the early symptoms often include a need to hold reading material further out, a requirement for added light for near tasks and considerable annoyance accompanied by a desire for the vision of youth. Reading glasses, bifocals, bifocal contacts, progressive addition lenses (PALs) and sometimes correcting one eye for distance and the other for near with contact lenses, called “monovision” are among the systems that are used for compensating for presbyopia.
Contributing editor Palmer R. Cook, OD, is an optometric educator and optical dispensing expert.